
DIY Eyebrow Tinting: Unlock Fuller, Defined Brows From The Comfort Of Your Home
Tired of penciling in your eyebrows every single morning? Do you dream of waking up with perfectly shaped, bold brows that require minimal effort? If you're nodding along, then it's time to discover the magic of eyebrow tinting at home. For fuller, more defined eyebrows with little upkeep, few treatments can compare to that of a brow tint. It's a game-changer for anyone looking to enhance their natural brows without the daily hassle of makeup.
Sure, you can fill them in with a brow pencil or powder, but brow tinting is so much easier and longer-lasting. This comprehensive guide will walk you through everything you need to know about achieving salon-quality results right from your own bathroom. We'll cover why you should try it, what products to use, a step-by-step application process, and expert tips to ensure your brows look flawless.
Why Tint Your Brows at Home? The Benefits Are Clear
Getting your eyebrows tinted is a fantastic way to enhance your natural brows, giving them a more pronounced and polished look. But why bother doing it yourself when salons offer the service? The answer lies in convenience, cost-effectiveness, and control.
- How To Protect Dyed Hair From Chlorine
- How To Use Tatcha Serum Stick
- Hot Towel Treatment
- How To Make Blonde Hair Darker
- Defined Lips
- Time-Saving: Imagine cutting down your morning routine significantly. With tinted brows, you can skip the daily filling, shaping, and setting. This means more time for coffee, sleep, or whatever else your morning holds!
- Cost-Effective: Professional brow tinting can add up over time. Here's how to DIY your own eyebrow tinting at home for under $10, making it an incredibly budget-friendly beauty solution.
- Enhances Natural Beauty: Eyebrow tinting darkens the fine, light hairs you might not even notice, adding density and definition to your existing brows. This creates the illusion of fuller brows without needing to draw them on. The shape and color of your brows have the power to modify your appearance completely because they are a marker of beauty.
- Long-Lasting Results: Unlike makeup that can smudge or fade, a good brow tint can last for several weeks, providing consistent color and shape.
- Accessibility: You don't need an appointment or a trip to the salon. You can easily tint your eyebrows at home whenever it suits your schedule. We spoke to makeup artist and brow expert Bob Scott about how exactly to pull this technique off from the comfort of your own bathroom. It's actually surprisingly easy to tint your brows!
While there are a number of newer techniques that enhance eyebrows from microblading to brow lamination and powder brows, eyebrow tinting is often the easiest and most cost-effective entry point for transforming your look.
Getting Started: What You'll Need
To embark on your at-home eyebrow tinting journey, you'll need a few key items. The good news is that most of what you need can be found in easy-to-use kits or even put together with common household items.
Choosing Your Tinting Product
When it comes to products, you have several options:
- Jamaican Black Castor Oil Hair Growth Before And After
- Quincecoupon Code
- Model With No Belly Button
- Rihanna Gray Hair Color
- Blackhead Remover Strips
- At-Home Tinting Kits: These kits are designed specifically for DIY use and typically include everything you need: dye, developer, mixing tools, and sometimes even application brushes. Try one of these easy-to-use eyebrow tinting kits for full, defined eyebrows with a wide range of shade options. Some popular choices include:
- The Best At-Home Eyebrow Tint Overall: Brow Code Brow Tint Kit. This tint is perfect for anyone serious about at-home eyebrow tinting, as it lasts impressively long on both the skin and brow hairs. Plus, Brow Code offers an entire playlist of tutorials for their products.
- The Best Temporary At-Home Eyebrow Tint: Hally Brow Pal.
- The Best Drugstore At-Home Eyebrow Tint: Ardell Brow Tint.
- DIY Natural Tints: If you want to dye your eyebrows but don't want to shell out cash for a professional kit, you're in luck. You have several options for making tints at home. Cocoa powder is a common ingredient for a temporary, natural tint, though results may vary in longevity and intensity compared to professional dyes.
Other Essential Tools:
- Petroleum jelly (Vaseline) or a thick balm to protect your skin.
- Cotton swabs or Q-tips for precise application and cleanup.
- Cotton pads.
- A small mixing dish and applicator brush (often included in kits).
- Water-based makeup remover.
- Timer.
- Old towel or cloth to protect surfaces.
Step-by-Step Guide to At-Home Eyebrow Tinting
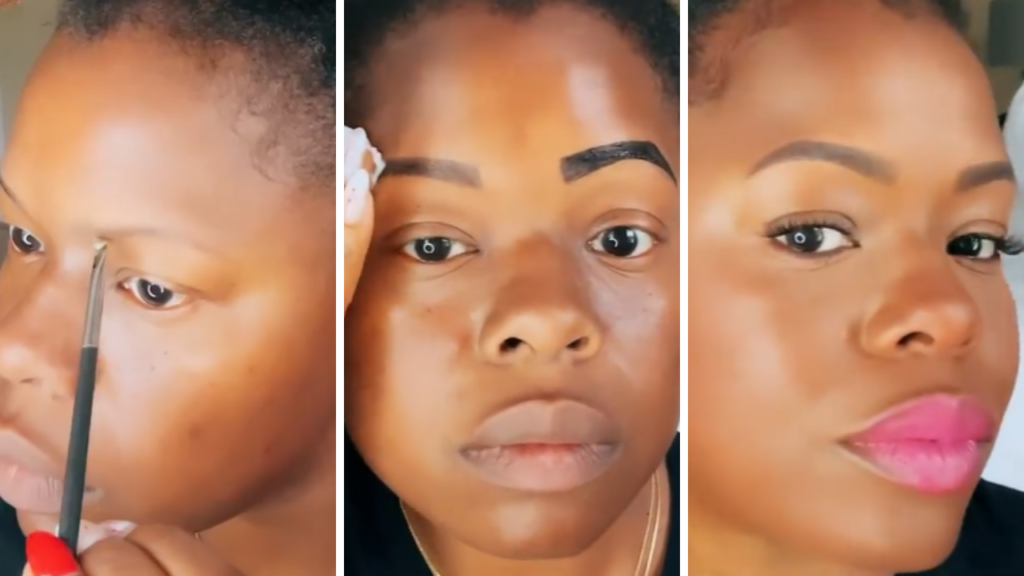
Tinting your eyebrows at home might seem intimidating, but it’s actually quite simple. With a few techniques in your arsenal, you’ll have the bold brows of your dreams in under 15 minutes. Follow our photo guidelines and step-by-step review for flawless brows. Here's how to tint natural brow hairs:
1. Choose Your Color Wisely
This is crucial for a natural-looking result. Choose an eyebrow color two or three shades darker than your natural brows for a natural look. If you have very dark hair, you might opt for a shade that matches your hair color. When in doubt, go lighter – you can always go darker later, but it's harder to lighten. Remember, the goal is to enhance, not overpower.
2. Prep Your Face and Brows
Cleanliness is key for proper dye absorption and preventing irritation. Prep your face by washing your eyebrows thoroughly. You can easily tint your eyebrows at home by following the steps below. First, cleanse the area by using a water-based makeup remover to clean the brow areas. Ensure your brows are completely dry before proceeding.
3. Protect Your Skin
Apply a thin layer of petroleum jelly or a thick balm around your eyebrows, making sure to avoid getting it on the brow hairs themselves. This acts as a barrier, preventing the tint from staining your skin. Be precise with this step to maintain your desired brow shape.
4. Mix the Tint
Follow the instructions provided with your specific tinting kit. Typically, this involves mixing the tint cream with a developer in a small dish. Ensure it's thoroughly mixed to a consistent paste. Always perform a patch test 24-48 hours before full application to check for any allergic reactions.
5. Apply the Tint
Using the applicator brush (or a clean spoolie), carefully apply the tint to your eyebrows. Work in small sections, ensuring every hair is coated. Start from the tail of your brow and work your way to the front. Be precise and try to stay within your natural brow shape. If you make a mistake, quickly wipe it off with a damp cotton swab.
6. Let it Process
This is where the timer comes in! The processing time varies depending on the product and your desired intensity. Generally, it's between 5-10 minutes. For a lighter tint, start with the minimum time; for a bolder look, go a little longer. Keep a close eye on your brows during this period. Remember, the longer it sits, the darker the results will be.
7. Remove the Tint
Once the processing time is up, gently wipe off the tint with a damp cotton pad. Start from one brow and work your way across. Continue wiping until no more color comes off. You might need to use several cotton pads. Rinse your brows with cool water to remove any residue.
Expert Tips for Flawless Results
Ahead, brow experts share their top tips for tinting your brows at home to ensure you get the best possible outcome:
- Start Light, Go Darker: It's always easier to add more color than to remove it. If you're unsure about the shade or processing time, err on the side of caution and go for a lighter tint first. You can always reapply for a deeper shade after a day or two.
- Precision is Key: Use a small, angled brush for application to ensure you coat every hair without staining the skin around your brows.
- Consider Brow Lamination: Transform your brows at home using the Brow Code At-Home Brow Lamination Kit & Brow Code At-Home Brow Tint Kit. While each kit works perfectly on its own, this is your guide on how to combine them to achieve beautifully sculpted and tinted brows. Lamination can make your brows appear even fuller and more uniform.
- Aftercare Matters: To prolong the life of your tint, avoid oil-based cleansers or makeup removers directly on your brows. Pat them dry gently after washing your face.
- Don't Rush: Tinting your eyebrows at home might seem intimidating, but it’s actually quite simple. With a few techniques in your arsenal, you’ll have the bold brows of your dreams in under 15 minutes. However, don't rush the process, especially the application and removal steps, to avoid mistakes.
Final Thoughts
If your brows are looking a little worse for wear, you can definitely try out DIY eyebrow tinting at home! Of course, we don't all have naturally robust coloring to fall back on, which is where at-home brow tinting can take your everyday routine to the next level—without having to cake on makeup. It's an accessible, affordable, and highly effective way to achieve those coveted bold, defined eyebrows you've always wanted. By following this guide, learning the art of do-it-yourself eyebrow tinting, and discovering easy at-home techniques, recommended products, and aftercare tips, you'll be well on your way to perfectly shaped and colored brows that truly enhance your natural beauty. Say goodbye to daily brow pencils and hello to effortless, stunning brows!
Article Recommendations
- Frizzy Hair Hair Mask
- Nasty Ice Cream Flavors
- Unicorn Makeup For Halloween
- Fun Color Hair Ideas
- Brunette Highlights


Detail Author:
- Name : Callie Bode
- Username : cristina.davis
- Email : annetta.emard@hotmail.com
- Birthdate : 1976-09-01
- Address : 51928 Amos Prairie Port Verlie, IL 58130-2148
- Phone : 281-950-0392
- Company : Bosco, Hill and Moen
- Job : Gaming Supervisor
- Bio : Maxime magnam nobis suscipit. Ea quam rerum autem aspernatur harum tempora. Fugit cumque et reprehenderit ut dolores. Dolor laborum facere et a labore aut ut. Quia qui earum qui in enim eius et.
Socials
tiktok:
- url : https://tiktok.com/@katrine8275
- username : katrine8275
- bio : Ipsum et quaerat nemo amet perferendis dignissimos repellendus.
- followers : 4474
- following : 2155
twitter:
- url : https://twitter.com/katrine3914
- username : katrine3914
- bio : Ab nihil velit rerum omnis dolorum tenetur. Beatae facilis eaque tempore. Doloribus quia voluptatibus amet asperiores. Sunt in repellat esse est minima.
- followers : 4305
- following : 673
instagram:
- url : https://instagram.com/katrine.wisozk
- username : katrine.wisozk
- bio : Ut culpa omnis vel sit suscipit porro. Et ratione officiis et delectus officia assumenda sunt ad.
- followers : 6882
- following : 1224
facebook:
- url : https://facebook.com/katrine_dev
- username : katrine_dev
- bio : Sapiente magni ut nam atque commodi quaerat.
- followers : 5342
- following : 2691
